It is common knowledge that a regular practice of yogasanas bring health as well strength and dexterity to deal with day to day life hassles. In the west, people are mostly using yoga asana as a mere physical exercise and most of them are not aware of its spiritual benefits as well as its power to manage stress.
One of the lesser known benefits of practicing yogasanas is the ability to increase brain power, memory and concentration. Here is a list of top 6 asanas and pranayamas you can do that will help you recover and strengthen that fading memory, low attention span, and will help deepen your concentration levels. You will notice that the more you need to concentrate for practicing a specific asana, the better result it will produce in improving your brain power.
1. Paschimottanasana (Seated Forward Bend)
In the book Yoga: The Path To Holistic Health by B.K.S.Iyengar (a renowned yoga teacher from South India), the author talks about this asana as being great for increasing memory and relieving stress. Some benefits mentioned are:
- It is great for increasing the flexibility of the spine.
- Helps manage lower back pain by making the back muscles stronger with regular practice.
- Sharpens memory.
- Relieves stress, headache, fatigue, migraine and eye strain.
- Gives relief from pain in sciatica, varicose veins, and arthritis.
- Rests the heart, normalises blood pressure and the pulse rate.
- Improves blood circulation in pelvic region and tones pelvic organs.
- Strengthens the vertebral joints and stretches the ligaments of the spine.
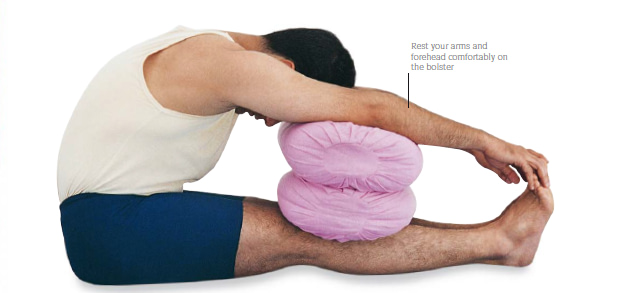
Guru Iyengar explains that this asana is progressive in nature and can be done initially with the help of a prop like a bolster. As a person eases into the asana, he can start doing it without the props.
Here is the version of asana as explained in the book. (You can pick up this book on amazon if you want to learn different easy to do variations of asanas. There are more variations mentioned and shown in the book.)
Steps To Perform
- Sit in Dandasana. Place 2 bolsters on top of each other and place them across your knees. Ensure that your ankles, heels and big toes are tucked together. Stretch and arms and bend forward. Try to touch just at the base of the toes.
- Try to bend from the base of the spine, pushing and elongating your torso, stretching it from the groin to the navel. Don’t contract abdominal muscles. Rest forehead and elbows and the bolsters. Keep your calf and thighs fully stretched.
- Extend your neck and push you shoulders down and back, away from the earns. Keep your arms straight and don’t tense any body part. Breath evenly and stay in the pose for 5 minutes.
Caution:If you are suffering from cervical spondylosis, asthma, bronchitis or diarrhoea, do not perform this asana.
Read Article: Top 7 Yoga Poses For Neck Pain Relief: Asanas For Cervical Spine
2. Uttanasana (Intense Forward Stretch)
Uttanasana is a classical forward bending stretch which is considered great for the brain as well as abdominal and lower body flexibility. It is a calming and recuperative asana which energies the heart and lung. Some of its other benefits include
- Relives insomnia, fatigue and headache
- Helps relieve constipation and digestive issues
- Helps build the strength and flexibility of thighs, buttocks, knees and calf muscles
- Tones the abdominal muscles.
- Relives stress and improves memory.
- Relives migraine and stress related headache.
- Calms the mind and reduces depression on regular practice.
- Stimulates liver and kidney
- Good for asthma, high blood pressure, forgetfulness, infertility and early onset of Alzheimer.
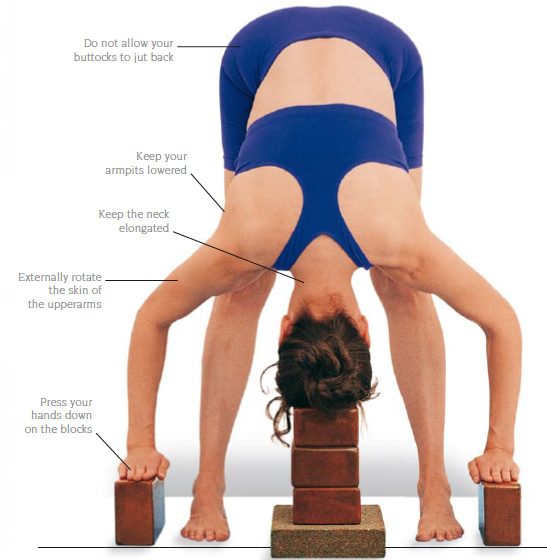
Yoga guru B.K.S. Iyengar suggests the use of yoga blocks (5 wooden blocks and 1 foam block) as a starting position for a beginner and gradually moving to the difficult full asana.
Steps To Perform
- Stand in tadasana. Keeps legs parallel and maintain a distance of 1ft between the legs, toes pointing forward.
- Place 1 foam block with 3 wooden blocks on top of the foam block. Keep them in front of you.
- Pull up your knees. Inhale and raise your arms towards the ceiling, palms facing foward. Extend your spine up.
- Bend from the waist toward the floor. Press your heels on the floor to increase the stretch of your spine. This is vital for correct practice.
- Elongate the sides of your trunk downward.
- Rest the crown of your head on the blocks in front of you, and place your palms on the blocks beside your feet. Pull in your kneecaps. Extend your hamstrings and pull your inner legs upward. Feel one single stretch from the heels to the crown of your head. Hold the pose for 1 minute.
Caution: Don’t practice if suffering from osteoarthritis, rheumatoid arthritis, fever or diarrhoea. If you are suffering from low blood pressure, come out of the pose gradually to avoid any dizziness.
3. Ardha Chandrasana (Half Moon Pose)
Ardha Chandrasana or half moon pose which requires some time to master as it is a balance and coordination based asana. The benefits of this pose are immense.
- Helps relieve stress and calms the mind.
- Improves concentration and sharpens memory.
- Relives fatigue and anxiety when done against the wall.
- Rotates and flexes the vertebral joints, keeping the spinal muscles supple
- Helps deal with sciatica, osteoarthritis.
- Great for constipation and gastritis
- Helps reduce back pain.
- Helpful in reducing menstrual cramps and pain.
- Correct muscle imbalance and misalignment of shoulders.
- Corrects prolapsed uterus.
- Strengthens the buttocks, spine, thighs, abdomen, groin, calves and hamstrings.
Steps To Perform
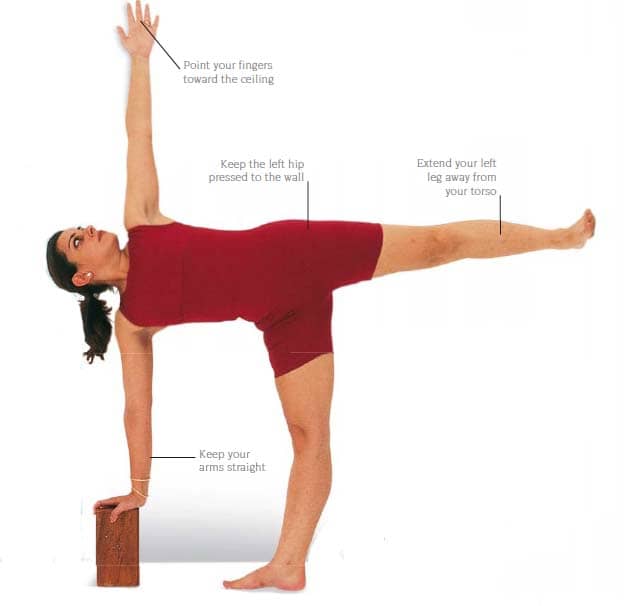
- Stand in Tadasana. Place a block on its short side against the wall. Inhale, spread your feet 3.5 ft apart. Raise your arms to shoulder level.
- Turn your right foot out to the right, parallel to the wall, and turn your left foot in, slightly to the right. Bend your right knee, and place the right palm on the block. Raise your left arm.
- Straighten your right leg. Raise your left leg, until it is parallel to the floor. Keep your left arm stretched up, in line with the right arm. The back of your left hand should touch the wall.
- Look up at your left thumb. Keep your right foot, thigh, and hip aligned. Balance on the right leg and not on your right arm. Hold the pose for 20 seconds. Repeat on the other side.
Read Article: Top 7 Yoga Asanas For Painful Menstruation, Period Cramps & Bloating
4. Salamba Sirsasana (Headstand)
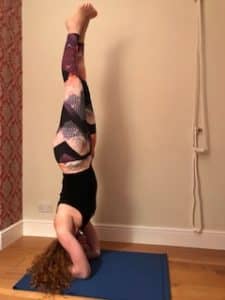
Salamba means ‘supported’ and ‘sirsa’ means head. This pose requires the practitioner to totally invert the body with the head supported by hands. It is an amazing asana due to its tremendous benefits but can also be dangerous if done in haste and without proper guidance.
On the mental level, it improves memory and concentration along with body-mind coordination. Due to the inverted position, fresh oxygenated blood moves to the brain which helps manage stress levels and gives a boost to brain power.
- Enhances memory and concentration
- Improves body mind coordination
- Increases attention span
- Helps in spiritual growth.
- Combats depression and alleviates insomnia
- Improves the functioning of pituitary and pineal gland.
- Strengthens the lungs and core muscles.
- Relives cough, cold and tonsillitis symptoms.
- Builds stamina
Steps to perform
- Kneel on the floor and clasp your finger together tightly to form a cup. Place your forearms on the floor. Ensure that the distance between your elbows is not wider than the breadth of the shoulders. Fingers should be firmly locked but not rigid.
- Place the crown of your head on the floor so that the cupping formed by your palms touches the back of your head. Only crown should rest on the floor. This is very important as the body should be centeredly aligned or else the pressure could bend the spine in incorrect manner.
- Push up using the balls of your feet and keep the knees straight. Your torso should be perpendicular to the floor. Walk your feet towards your body till the torso comes in straight line. This is take some time to perfect for the beginners. Take your time till you perfect this pose.
- In the next step, exhale and bring your knees towards chest. Then pressing your toes down on the floor, push your legs upwards off the floor like a hop. Bring the heels close to the buttocks.
- Press your elbows to the floor and lift your shoulders up, away from the floor. Exhale, and gently swing your knees upward in a smooth arc, until both your thighs are parallel to the floor. In this position, the entire upper body, from the head to the waist and hips, should be perpendicular to the floor. Do not move your elbows until you come out of the final pose.
- Continue to move the knees upward, slowly bringing them to point to the ceiling. Keep the heels close to the buttocks. Focus on your balance and do not allow your torso to move during this action.
- Once your knees are pointing to the ceiling, hold the pose for a few breaths. Make sure that the spine is straight. Tighten the buttocks. Ensure that your thighs are positioned perpendicular to the floor, your lower legs bent toward your back. Check that your shoulders do not tilt. Pause and get used to the feel of the position.
- Straighten your knees to bring the lower legs in line with the thighs, so that your body forms a vertical line. Point your toes toward the ceiling. Tighten both knees, as in Tadasana, and keep your thighs, knees, and toes together. The entire body should be balanced on the crown, not on the forearms and hands, which should simply support the balance in the pose. Stretch your upper arms, torso, and waist upward, along the legs to the toes, ensuring that your torso does not tilt. Steadiness and a constant lift of the shoulders ensure stability in the posture. Hold the pose for 5 minutes, breathing evenly.
Caution: This is an advanced level asana that needs 5 to 6 months to slowly progress to proper posture. It needs to be performed under expert guidance of a yoga teacher. Practice of this asana is strictly prohibited for people suffering from hypertension, or eye conditions like detached retina or glaucoma, cervical spondylosis, migraine, headache. Do not perform if you are currently menstruating or have neck or head pain of any sort. If you are suffering from low blood pressure, perform the asana only once in a session.
5. Nadi Shuddhi Pranayama (Anulom Vilom)
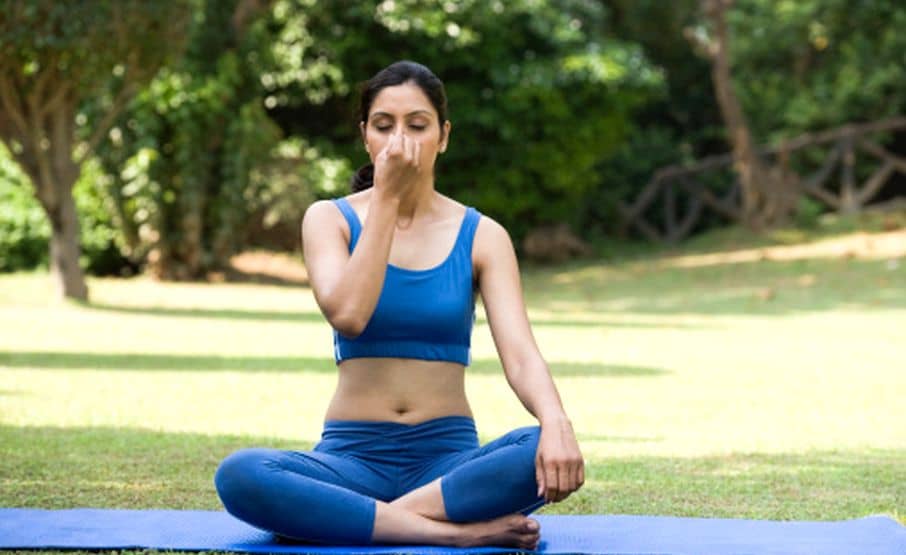
Nadi shuddhi also commonly known as Anulom vilom pranayama is a powerful breathing technique which is great for mental health, memory and concentration. Its many benefits include
- It is most powerful for detoxifying the body.
- Clears the blockages of ida, pingala and Sushumna Nadi which are the three important energy channels of the body, blockage of which can create imbalances.
- Keeps the mind calm and uplifts the mood.
- Improves memory and concentration
- Eliminates stress, fatigue and tension.
Steps to perform
- Sit comfortably in a cross legged position with your spine erect.
- Close your eyes and keep mild focus on your breath
- Close your right nostril and take a full breath in from the left nostril.
- Close the left nostril and release the right nostril and breath out from it.
- Repeat this for 10 minutes.
Other Notable mentions: Sarvangasana (12 to 18 breaths), Masyasana (focus on tip of nose for concentration), Antaranga Trataka ((internal concentrated gazing), Vrikshana or the tree pose
Did you find this post useful? Would you like to get back to it later? Save THIS PIN below to your Pinterest Natural Living or Yoga board!